How To Implement A Bottom Sheet With <dialog>

Modern Web Weekly #28
Does my Service Worker serve this from the cache?
This week, I was reminded of a common misconception concerning Service Workers and serving files from the cache.
As you know, a Service Worker can cache static assets and HTML pages so these can be served from the local cache instead of the network. This not only makes the response faster, but it also enables web apps to function fully offline.
Sometimes you need to check if a file or page is served from the cache. I ran into this many times when I had to fix offline support for web apps. In that case, I had to check why a certain route, usually the home route, was not served from the Service Worker's cache.
When the home route is not properly cached and a PWA is opened while the user is offline, the app won't work and simply shows a page that there's no internet connection. But when I checked the Network panel while online, it reported that the route was indeed served by the Service Worker:

This means it's served by the Service Worker and therefore it's served from the cache, right?
Well actually, no.
What this really means is that the file is indeed served by the Service Worker but it does not necessarily mean it served it from the cache. This only means the Service Worker returned the response, nothing else.
In other words, the Service Worker contains a fetch handler, an event handler for the fetch event that intercepts all network traffic from the web app. Inside this handler, the Service Worker decides if the response for the request will come from the cache or the network:
self.addEventlistener('fetch', e => {
  e.respondWith(
    // check if the url is cached
    caches.match(e.request)
    .then(response => {
      // if there is a response in the cache, serve it
      if(response) {
        return response;
      }
      // if not, serve it from the network
      else {
        return fetch(e.request);
      }
    })
  )
})
Service Worker fetch handler
This is a naive and very basic implementation, but you get the idea here. The Service Worker checks the cache for a response and serves it if it's found otherwise, it will go to the network for a response.
Serving a response is done with the respondWith method of the FetchEvent object.
Note that this will not work when there's no response in the cache and the app is offline since the network call will then not give a response either, but I intentionally kept this example simple to illustrate the idea.
So if a Service Worker contains a fetch handler that handles a response, the Network panel will report it came from the Service Worker, regardless of whether it came from the cache or the network.
The flow is like this:

When the Service Worker has a fetch handler, it will intercept all network traffic before it goes to the network. It sits in between your app and the network as it were.
If you want to prevent requests from going through the Service Worker's fetch handler, you need to prevent the Service Worker from serving a response for it with e.respondWith(). You can do this by returning from the fetch handler without serving a response.
For example, if you don't want the Service Worker to serve responses for JavaScript files (files with a .js extension), you could do something like this:
self.addEventlistener('fetch', e => {
  // don't serve .js files from the Service Worker
  if(e.request.url.endsWith('.js') {
    return false;
  }

  e.respondWith(
    ...
  )
})
Now you will see in the Network panel that the response is not handled by the Service Worker:

So how to check if a file or page is in the cache?
If you need to know if a file or HTML page is served from the cache, simply go to the Application tab in Chrome or Edge dev tools and scroll down to Cache storage, and click the arrow in front of it.
This will expand the item and show the cache(s) the web app uses:

If you click the cache you will see the list of entries that are in it including the content type, time cached, etc.
If you don't see the URL you want to be cached in this list, it means it's not cached. As I said, a common error in providing offline support for a PWA is that people forget to cache routes, especially the home route which is the start_url entry in manifest.json.
If the start_url of your PWA is / then you need to add this route to the URLs that are cached by the Service Worker:
const cacheName = 'cache-123';

const filesToCache = [
  '/src/css/main.css',
  '/src/js/index.js',

  // home route added to cache
  '/',
  ...
];

self.addEventListener('install', e => {
  e.waitUntil(
    caches.open(cacheName)
    .then(cache => cache.addAll(filesToCache))
  );
})
Learn to build and publish a component library that works in any web framework
The interactive Component Odyssey course will teach you everything you need to build a modern web component library. In over 60 lessons, learn how to build, style, and publish components that are interoperable with React, Vue, Svelte, and any other web framework.
Save yourself and your company weeks of development time by betting on the web and browser-native tools.
Start building components your users will love. Web Weekly readers get 10% off with the discount code MODERNWEB01.
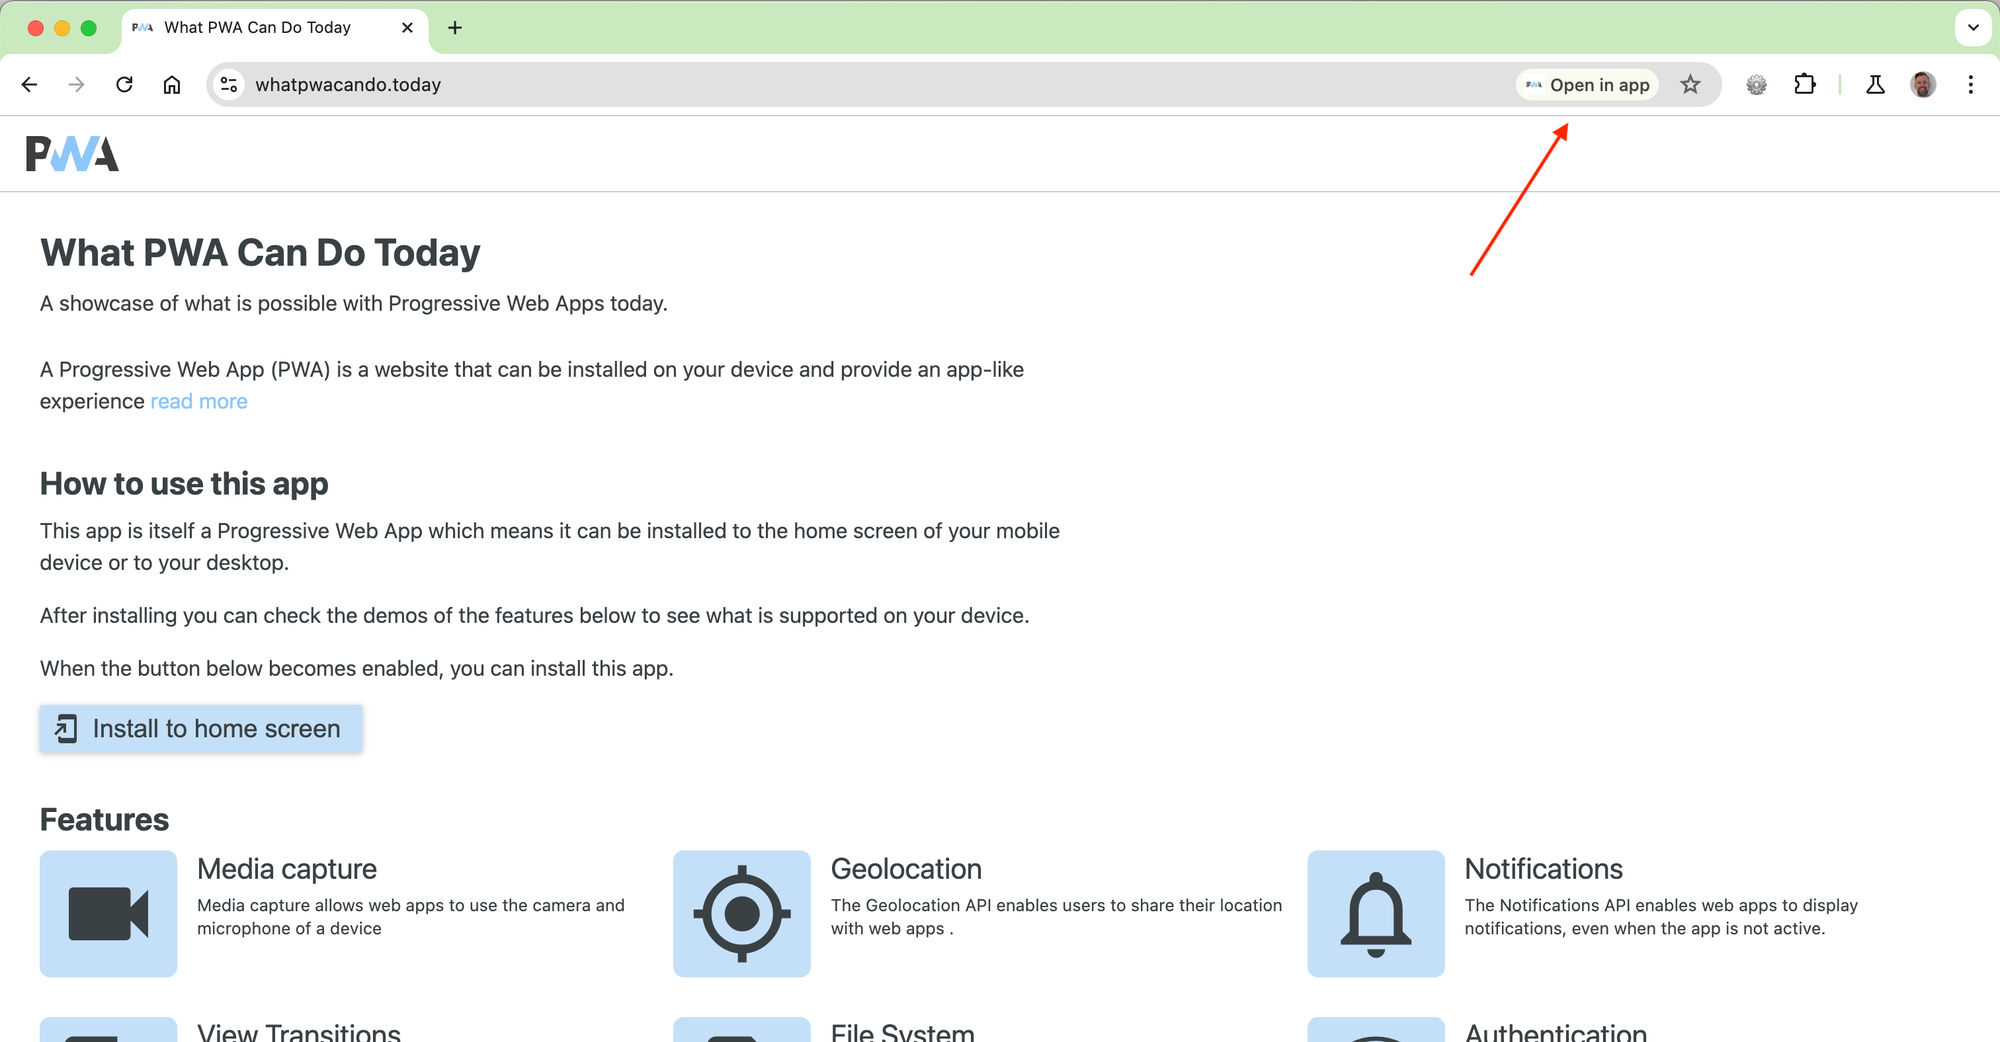
Open in App omnibox chip now in Chrome
Chrome 127 will now ship the omnibox chip that promotes opening an already installed PWA when that same app is opened in Chrome.
It's already available in Chromium Nightly and Chrome Canary but since this feature is very new, it's initially only rolled out to a limited number of users so you may need to enable the Desktop PWA Link Capturing flag that is found here:
chrome://flags/#enable-user-link-capturing-pwa
Here's what it looks like:

The chip shows the icon from manifest.json which is really nice!
The idea came from Chromium contributor Alexey Rodionov, more details in his post on X:
I'm super excited that my idea of a PWA omnibox chip to promote the opening (using) already installed PWAs, which I proposed and visualized more than 1.5 years ago, has finally been implemented in Chromium 127 on all desktop platforms (ChromeOS, macOS, Linux, Windows)! 🥳 https://t.co/ukRiJnCHXH pic.twitter.com/zTf1ehJuMd
— Alexey Rodionov (@alexey_rodionov) May 22, 2024
X post on omnibox chip by Alexey Rodionov
How to implement a bottom sheet with <dialog>
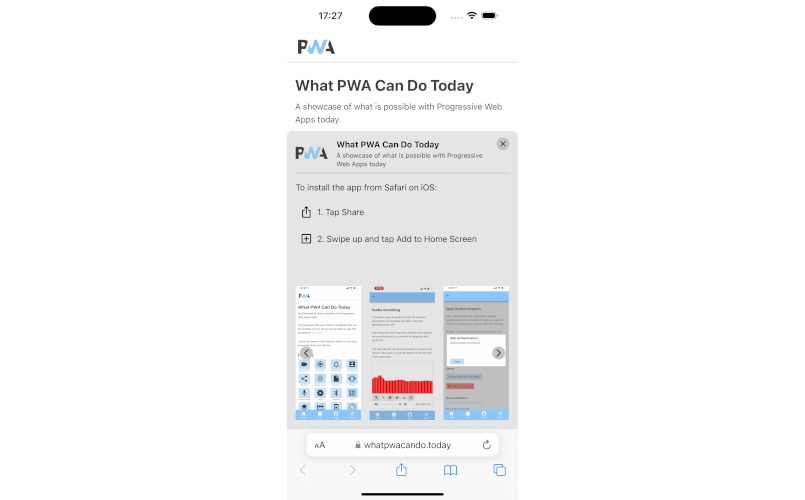
On mobile devices, a bottom sheet is a common UI component that contains supplementary content and is an alternative to inline menus and simple dialogs. I recently implemented one with <dialog> on What PWA Can Do Today to instruct iOS users how to install it as a PWA:
Bottom sheet on What PWA Can Do Today
Before, I implemented this bottom sheet as a <div> that would slide up and down but I decided it would be easier (and semantically correct) to use a <dialog>. Now that @starting-style is getting more browser support (Chrome and Safari currently) it's also easier to animate the showing and hiding of elements that are initially not displayed (like <dialog>).
The initial idea is to move the <dialog> to the bottom of the screen with top: auto and then hide it below the bottom of the screen with translate: 0 100%. This means the <dialog> will be translated along the y-axis for its entire height (100%).
Then, when the bottom sheet is opened, we reset the translate so the <dialog> appears at the bottom of the screen:
dialog[open] {
  translate: 0 0;
}
Then we define where we need to transition from with @starting-style:
@starting-style {
  dialog[open] {
    translate: 0 100%;
  }
}
Finally, we define which properties we want to transition and the duration of the transition. We also want to transition display because the <dialog> is shown and hidden and overlay because when the <dialog> is shown it sits in the top-layer and this is specified by the overlay CSS property.
overlay and display are so-called discrete properties and when we want to transition these we have to specify this with allow-discrete:
dialog {
  transition-property: translate, overlay, display;
  transition-behavior: allow-discrete;
  transition-duration: .3s;
}
This is basically all the CSS we need to animate the opening and closing of a <dialog> as a bottom sheet:
dialog {
  /* move dialog to the bottom of the screen */
  top: auto;

  /* hide dialog below the bottom of the screen when closed */
  translate: 0 100%;

  /* properties to transition, including overlay and display */
  transition-property: translate, overlay, display;

  /* indicate we want to allow transitioning of overlay and display */
  transition-behavior: allow-discrete;
  transition-duration: .3s;
}

/* style when dialog is open, where to transition to */
dialog[open] {
  translate: 0 0;
}

/* style when dialog is opened, where to transition from */
@starting-style {
  dialog[open] {
    translate: 0 100%;
  }
}
Then we just add some event handlers for showing and hiding the bottom sheet and we're in business:
const bottomSheet = document.querySelector('#bottom-sheet');
const openButton = document.querySelector('#open-button');
const closeButton = document.querySelector('#close-bottom-sheet');

openButton.addEventListener('click', () => {
  bottomSheet.showModal();
});

closeButton.addEventListener('click', () => {
  bottomSheet.close();
});
Here's a Codepen to demonstrate this. This is best viewed with the browser made smaller to make the page look like on a mobile device. For some reason, emulating a mobile device doesn't work, it fails to show the bottom sheet in the Codepen (you may need to open the browser version of this email to view this):
You'll notice that in Safari the bottom sheet is hidden instantly when closed instead of sliding down out of view. This is because Safari doesn't support overlay and therefore the hiding can't be animated since the dialog is not removed from the top-layer in Safari.
We can make this work for Safari and also for browsers that don't support @starting-style yet, although this will mean that Safari will also have to make use of the implementation for non-supporting browsers.
For browser that don't support @starting-style we can simply add the attribute opened when the bottom sheet is shown and add the translate rule that slides the bottom sheet into view to the CSS when this attribute is present:
dialog[opened] {
  translate: 0 0;
}
This opened attribute needs to be added to the bottom sheet when the open button is clicked and removed when the close button is clicked.
However, this won't work because this rule is also present that already slides the bottom sheet into view when it's opened:
dialog[open] {
  translate: 0 0;
}
and in browsers that don't support @starting-style this will cause it to be shown immediately without any transition since these browsers can't animate the showing of elements that start with display: none (which is the whole reason @starting-style was created).
Even worse, the CSS for the bottom sheet when the opened attribute is present in turn also interferes with browsers that do support @starting-style.
Luckily, we can fix this quite easily.
First, we'll make sure that the second block is only applied in browsers that do support @starting-style which we can currently target by checking for support of the overlay property. However, this doesn't apply to Safari that does support @starting-style and not overlay but unfortunately this is currently the only way to make this work in all browsers until they all support @starting-style.
If we wrap it in a @supports block it will only be applied to supporting browsers:
@supports (overlay: auto) {
  dialog[open] {
    translate: 0 0;
  }
}
We can also make sure that the opened attribute is only added in browsers that don't support @starting-style by checking for this in the event handlers for the buttons that open and close the bottom sheet.
In JavaScript we can check for support for the overlay property with:
const supportsCSSOverlay = CSS.supports('overlay: auto');In the event handler for opening the bottom sheet we still just call the showModal() method but here we also add the opened attribute in non-supporting browsers. To make this work correctly we need to wrap it in a setTimeout:
openButton.addEventListener('click', () => {
  bottomSheet.showModal();

  if(!supportsCSSOverlay) {
    setTimeout(() => bottomSheet.setAttribute('opened', ''))
  }
});
In the event handler for closing the bottom sheet we can just close it with the close() method in supporting browsers but in non-supporting browsers we only remove the opened attribute since that will trigger the closing animation.
We can only close the bottom sheet after the animation has finished in non-supporting browsers so therefore we also need to add a transitionend event handler in non-supporting browsers:
closeButton.addEventListener('click', () => {
  if(!supportsCSSOverlay) {
    bottomSheet.removeAttribute('opened');
  }
  else {
    bottomSheet.close();
  }
});

bottomSheet.addEventListener('transitionend', (e) => {
  if(!supportsCSSOverlay && !bottomSheet.hasAttribute('opened')) {
    bottomSheet.close();
  }
});
Here's the Codepen that also works in browsers that don's support @starting-style (you may need to open the browser version of this email to view this):

