Open Links Directly In Your PWA

Modern Web Weekly #25
In Modern Web Weekly #24, I showed you how you can register a PWA as an app that files can be opened with. This feature is part of the ongoing effort by browser vendors to improve the OS integration of web apps.
In addition to file handling, there are two ways to let your PWA open links when clicked: Protocol Handling and the Launch Handler API.
Protocol Handling
A protocol or scheme is what a URL starts with, like https:// or mailto:// for example. You can register your PWA to handle links that start with these well-known schemes or create your own, in which case the scheme must start with web+ followed by at least one lowercase ASCII letter. For What PWA Can Do Today I chose web+pwatoday.
This means that when a user clicks a URL like web+pwatoday://foo it will be opened in the installed PWA that's registered as a handler for this protocol. You can register your PWA declaratively in the manifest.json file or imperatively in JavaScript code.
Declarative registration
To declaratively register your PWA for a certain protocol, add the following to manifest.json:
"protocol_handlers": [
  {
    "protocol": "web+pwatoday",
    "url": "/protocol-handler-page?type=%s"
  }
]
Now when a user clicks a link like web+pwatoday://foo and the PWA is installed it will open the URL specified in the url member where the placeholder %s will be replaced with the URL of the link:/protocol-handler-page?type=web+pwatoday://foo
The special characters in the URL will be escaped so the resulting URL will be: /protocol-handler-page?type=web%2Bpwatoday%3A%2F%2Ffoo
Imperative registration
To imperatively register your PWA as a protocol handler:
navigator.registerProtocolHandler(
  'web+pwatoday',
  'https://whatpwacando.today/protocol-handler-page?type=%s'
);
Handling navigations
In the previous example, all links with the web+pwatoday protocol will be redirected to the page at /protocol-handler-page. From there, we can read the type query parameter to extract the original URL and act based on that.
In the following example, web+pwatoday://foo will be redirected to /foo:
// construct a URL object
const url = new URL(location.href);

// get the "type" query parameter
const params = url.searchParams;
const type = params.get('type');

// get the URL to redirect to: "web+pwatoday://foo" -> "/foo"
const page = type.split(':/').pop();

// redirect to "/foo"
location.replace(page)
I added a demo to What PWA Can Do Today.
Install the PWA and then open the link page from the demo, this page will open in a browser. Then close the PWA and click one of the links on the link page in the browser. This link will now open in the installed PWA.
Here's a screen recording of the demo:
Protocol Handling demo on MacOS
While Protocol Handling is a nice way to open links in your PWA, it's limited to supporting browsers (Chrome and Edge currently) and the links will be broken if you use a custom scheme (with the web+ prefix) and a user didn't install your PWA.
Luckily there's a better way.
Launch Handler API
The Launch Handler API enables web apps to open links that are within the scope of the app, meaning links that point to the domain the app is hosted on and that are within the scope defined in the manifest.json file.
Currently, the Launch Handler API is only supported on ChromeOS.
To enable it, add a launch_handler member to manifest.json with a client_mode object with a value of focus-existing, navigate-new, or navigate-existing:
"launch_handler": {
  "client_mode": ["navigate-existing"]
}
The navigate-existing value means the URL will be opened in the same window if the PWA is already running, navigate-new will open a new instance of the PWA.
When set to focus-existing, the PWA will be launched, and a new launchParams object will be added to the launchQueue with a targetURL property set to the value of the URL that was launched.
launchParams is the same object that is added to the launchQueue when you open a file with a PWA as explained in Modern Web Weekly #24.
if ("launchQueue" in window) {
  window.launchQueue.setConsumer((launchParams) => {
    if (launchParams.targetURL) {

      // do something with targetURL

    }
  });
}
This is for when you don't want to open the clicked URL in your PWA but do something else with it, for example perform an action based on the query parameters in the URL.
After you have installed the PWA and open a link that points to a page inside your PWA there will be an "Open in app" badge displayed in the address bar to open that link with the installed PWA:
After clicking it, a dialog will be shown to confirm your choice with a checkbox that you can check to remember your choice. After confirmation, all links within the PWA will now be opened with the installed PWA.
Here's a screen recording of the demo on ChromeOS:
Launch Handler API demo on ChromeOS
As mentioned, the Launch Handler API is currently only supported on ChromeOS, but I expect this to be implemented on other platforms in the near future.
Although not automatically, you can already open links in installed PWAs manually. When you open a link within the scope of an installed PWA in Chrome or Edge, an icon will appear in the far-right corner of the address bar to open that link in the PWA:
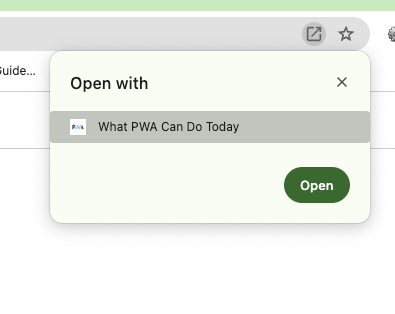
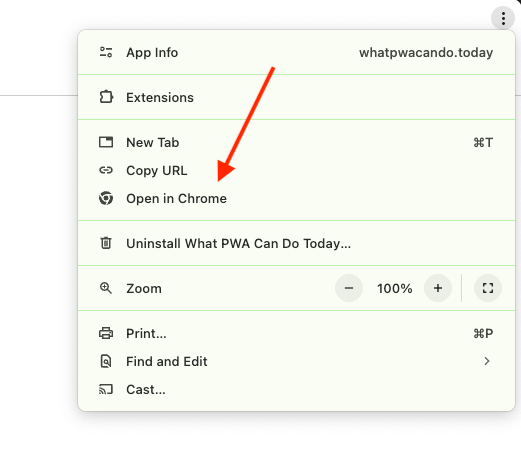
Conversely, you can open a link inside the installed PWA in the browser it was installed with:
When you add a web app to the Dock with Safari on MacOS and open a link inside the web app in Safari, it will show a banner to open the link in the app instead:

In Chrome on MacOS you can also enable opening links in the installed PWA by setting the experimental feature "Desktop PWA Link Capturing" to "Enabled" at chrome://flags/#enable-user-link-capturing-pwa:

When you enable this flag and relaunch Chrome, the "Open in app" badge will be shown in the address bar. Just like on ChromeOS, you can click the badge, confirm your choice, and from there on, all in-scope links will open in the installed PWA.
While you can also enable this flag in Chrome on Windows, I wasn't able to make it work there.
Tabs in a PWA
Most desktop apps offer some sort of tabbed layout and with the new tabbed application mode, your PWA can now too.
All you need to do is add "display_override": ["tabbed"] to your manifest.json file and you're in business!
This feature is experimental and still in development. The explainer mentions you can also add a tab_strip member to manifest.json to specify with which URL a new tab will be opened:
"tab_strip": {
  "new_tab_button": {
    "url": "/"
  }
},
When you don't add this, a new tab will be opened with the URL listed as start_url in manifest.json.
This feature is currently supported on MacOS and ChromeOS.
Check it out in the What PWA Can Do Today app on desktop or in the screen recording below:
PWA tabbed layout demo on MacOS
Fixing CSS specificity issues with @scope: don't overuse it
The @scope at-rule is a valuable addition to CSS but at the same time, it's also a feature that has the potential to be overused.
This is illustrated by an example that is often given of how @scope can solve problems with CSS specificity.
Let's say we have this CSS:
.blue h1 { color: blue; }
.green h1 { color: green; }
and this HTML:
<section class="green">
  <section class="blue">
    <h1>This is green (but was intended to be blue).</h1>
  </section>
</section>
This <h1> is green even though its parent <section> has class="blue".
This is because the CSS for the <h1> inside a parent with a "green" class is defined later and overwrites the CSS for the <h1> inside a parent with a "blue" class because both have the same specificity.
When two or more CSS rules have the same specificity, the one defined last wins.
We can solve this with @scope:
@scope (.blue) {
h1 { color: blue; }
}
@scope (.green) {
h1 { color: green; }
}But if you understand how proximity works in CSS, you don't need to use @scope.color is a CSS property that is inherited by default, which means that if this property is set on an HTML element, all its children will inherit the value from this property.
If multiple ancestors of an element have set a value for an inheritable property (like color), the child element will use the value set by its closest parent.
This is what proximity in CSS means.
With that in mind, we can simply fix the issue like this:
.blue { color: blue; }
.green { color: green; }
We simply remove h1 from the above rules and now the <h1> will get its value for the color property from its closest parent, regardless of the order of the CSS rules:
<section class="green">
  <section class="blue">
    <h1>This is now blue! </h1>
  </section>
</section>
This is just a simple example, but I hope you can see how @scope can be overused by adding more and more exceptions in more complex scenarios, while this can often be fixed by using the CSS cascade correctly.
There is, however, an issue with this approach: color is now set for all elements inside blue and green so when we want an <h3> for example to have another color we have to add more specific rules again:
<section class="green">
  <section class="blue">
    <h1>This is now blue!</h1>
    <h3>We want this to be red but it's blue</h3>
  </section>
</section>
.blue h3 {
color: red;
}
.green h3 {
color: yellow;
}If we want an <h3> inside blue to have a red color it will again be overwritten by the second rule (same specificity) and the <h3> will be yellow instead.
We can use this by using a Custom Property for the color of <h3> because Custom Properties inherit by default so this enables us to make almost any CSS property proximity-dependent:
.blue {
  color: blue;
  --h3-color: red;
}
.green {
  color: green;
   --h3-color: orange;
}

h3 {
  color: var(--h3-color)
}
Now the <h3> is red inside blue and orange inside green.
The Custom Property --h3-color inherits like the color property and is therefore also proximity-dependent and <h3> gets the correct color regardless of the order in which the rules are defined. At the same time, it's also only applied to <h3>.
This is how you can use proximity while you can still only apply the CSS to a specific element.
You can see all this demonstrated in the Codepen below that I created for Modern Web Weekly #24 and now updated for this edition (you may need to view the browser version of this email to be able to see it):